Category: power lift chairs
Posted by 2025-12-29 11:12
hoyer lift how to use
The Complete Guide to Hoyer Lift Usage: A Safety Operation Manual from Novice to Expert
The correct use of a Hoyer Lift (patient lift) is crucial for ensuring the safety and efficiency of caregiving. hoyer lift how to use This guide will take you through a step-by-step process to master a complete skill set, from basic operations to advanced techniques.
Pre-Use Preparation Phase
Environmental Safety Check
Clear all obstacles along the transfer path.
Ensure the floor is dry, level, and free of obstacles.
Verify that the target location (bed, wheelchair, toilet) is securely fixed.
Confirm there is sufficient operating space (a minimum of 1.5m × 1.5m is recommended).
Equipment Integrity Check
Inspect the sling for wear, tears, or deformation.
Ensure all hook safety locks function properly.
Test the hydraulic system to confirm smooth lifting and lowering.
Check that the base legs are fully extended and locked.
Verify that the wheels rotate flexibly and the brakes work effectively.
Communication Preparation with the User
Explain the transfer process in detail and obtain the user’s understanding and consent.
Confirm the user is in a comfortable body position.
Check that the user’s clothing is flat and free of wrinkles.
Assess whether the user’s current physical condition is suitable for transfer.
The 8-Step Standard Operation Process
Step 1: Proper Sling Placement
Assist the user to lie on their side (if possible).
Fold the sling in half and lay it flat under the user’s back and buttocks.
Ensure the sling’s centerline aligns with the user’s spine.
Help the user return to a supine position and adjust the position of the leg straps.
Adjust the sling to a comfortable position, avoiding wrinkles.
Step 2: Precise Equipment Positioning
Push the lift close to the bed edge at a 30–45° angle.
Ensure the base legs are securely extended under the bed.
Engage the brakes on all wheels.
Adjust the boom to be directly above the user.
Confirm the equipment is stable and does not wobble.
Step 3: Confirm Safe Connection
Connect the sling loops following the "far-to-near" principle.
Listen for the "click" sound indicating each hook is locked in place.
Double-check that all hooks are fully locked.
Ensure the sling bears weight evenly at all four corners.
Check that the sling position will not cause discomfort.
Step 4: Test Lifting
Operate slowly to lift the user slightly (approximately 5–10 cm).
Pause to check the equipment’s stability and the user’s condition.
Continue lifting smoothly if no abnormalities are found.
Lift the user to a safely sufficient height (usually 15–20 cm above the bed surface).
Observe the user’s reaction to ensure comfort and safety.
Step 5: Smooth Transfer
Release the brakes and push the equipment steadily.
Maintain a constant speed, avoiding sudden stops or starts.
The caregiver should walk backward to guide the transfer while monitoring the path ahead.
Move the user accurately to a position directly above the target location.
Use the boom’s telescopic function (if available) for precise positioning.
Step 6: Safe Lowering
Lower the user slowly to approach the target seat.
Pause briefly just before contact to make fine adjustments to the position.
Lower the user completely and confirm they are in a stable, hoyer lift how to use comfortable sitting position.
Wait for the user to adapt to the new position before proceeding to the next step.
Step 7: Disconnect the Sling
Unhook the sling following the "near-to-far" order.
Ensure each hook is placed safely to avoid injuring the user.
Assist the user in adjusting to a comfortable posture.
Gently pull the sling out from under the user.
Step 8: Post-Transfer Tasks
Push the lift back to its storage position.
Clean and disinfect the used sling.
Record the equipment’s usage status.
Prepare the lift for next use.
Key Operating Points for Special Scenarios
Bed-to-Wheelchair Transfer
Position the wheelchair at a 30° angle to the bed.
Remove the wheelchair armrests and footrests in advance.
Be careful to avoid the user’s knees colliding with obstacles.
Confirm the wheelchair brakes are locked before lowering the user.
Bathroom Transfer
Use a dedicated toileting/showering sling.
Ensure there is sufficient operating space around the toilet.
Pay special attention to floor slip prevention.
Prepare quick-cleaning supplies.
Floor-to-Bed Transfer
Use a dedicated floor rescue sling.
An additional caregiver may be required to assist.
Adopt a phased lifting strategy.
Closely monitor the user’s physical condition.
In-Depth Analysis of Safety Standards
Ten Strict Prohibitions
Exceeding the equipment’s rated load capacity.
Operating on sloped or slippery floors.
Using worn or defective slings.
Leaving a suspended user unattended.
Operating the equipment without engaging the brakes.
Lifting/lowering or moving the equipment rapidly.
Allowing the user’s body to collide with obstacles.
Using non-original or uncertified accessories.
Forcibly intervening manually while the equipment is in operation.
Ignoring the user’s signals of pain or discomfort.
Professional Skin Protection Techniques
Place a soft cotton pad between the sling and the user’s skin.
Check the skin condition at pressure points (bony prominences) after each transfer.
Choose wide, soft, dedicated slings.
Regularly change the stress-bearing positions of the sling.
Avoid prolonged pressure on the same area from the sling.
Troubleshooting Guide
Common Issue Resolution
Difficulty lifting/lowering: Check the hydraulic oil level and confirm there are no leaks.
Equipment tilting: Stop operation immediately and check if the base is fully extended.
Abnormal noises: Cease use and contact professional maintenance.
Power failure: Use the emergency manual lowering device.
Emergency Response Process
Stay calm and reassure the user.
Assess the severity of the situation.
Activate the corresponding emergency plan.
Seek professional help if needed.
Record details of the incident for subsequent analysis.
Skill Advancement Path
Basic Skill Mastery
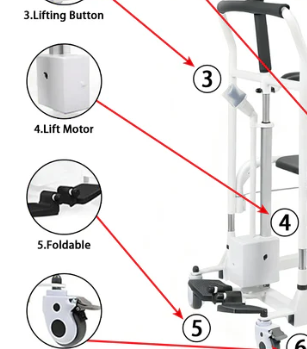
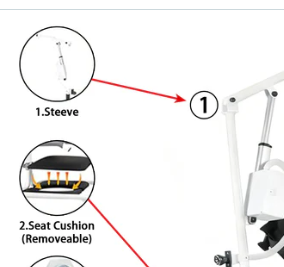
Recognizing the names and functions of all equipment components.
Proficiently executing the standard operation process.
Strictly adhering to basic safety standards.
Correctly performing daily maintenance tasks.
Advanced Skill Development
Developing the ability to flexibly respond to special scenarios.
Cultivating the ability to handle emergencies calmly.
Building the ability to develop personalized transfer plans.
Gaining the ability to train other caregivers.
Expert-Level Skills
Evaluating complex cases and designing transfer plans.
Providing suggestions for equipment modification and optimization.
Driving continuous improvement in care quality.
Disseminating industry best practices.
Conclusion
Mastering the professional skills for Hoyer Lift use is a continuous process of learning and improvement. Starting with strict adherence to operating standards, hoyer lift how to use and progressing to flexible adaptation to various special situations, each step of refinement adds a layer of protection to care safety. Remember, the true essence of high-quality care lies in the perfect combination of professional technology and humanistic care. Let us use professional knowledge, proficient skills, and a warm heart to provide every user with a safe, comfortable, and dignified care experience.