Category: power lift chairs
Posted by 2026-01-09 13:01
hoyer lift training manual

Hoyer Lift Operation Training Manual: Safe, Standardized, and Dignified Transfer Practices
In modern care settings, the Hoyer Lift has become an indispensable tool for ensuring the safe transfer of patients with limited mobility. It not only reduces the physical burden on caregivers but also significantly lowers the risks of patient falls, skin injuries, and secondary harm. However, the equipment itself cannot automatically guarantee safety—only personnel who have received systematic training, mastered correct operating procedures, and always maintain a cautious attitude can truly leverage its protective role.
This training manual aims to provide family caregivers, nursing staff, rehabilitation assistants, and relevant workers with a clear, practical, and safety-focused Hoyer Lift operation guide. Whether you use an electric or manual model, the principles and steps emphasized below are applicable. Please be sure to read carefully before actual operation and complete your first hands-on practice under the guidance of experienced personnel.
I. Core Principles: Safety, Respect, and Individualized Assessment
Safety always comes first. Before each use of the Hoyer Lift, you must confirm that the equipment is in good condition, the environment is suitable, and the patient is eligible for transfer. Never skip any inspection steps due to time constraints or operational proficiency.
Meanwhile, transfer is not just a physical action but also an interaction between people. hoyer lift training manual Before operation, you should clearly explain the upcoming steps to the patient and convey a sense of reassurance in a gentle tone. Even if the patient cannot speak, you should show respect through eye contact, gestures, and body language. Protecting privacy is also important—when placing the sling or adjusting clothing, use bed sheets or curtains to cover areas that do not need to be exposed.
Furthermore, it is essential to recognize that not all patients are suitable for Hoyer Lift use. For example, patients with unhealed fractures, severe osteoporosis, spinal instability, or extensive skin damage may require alternative transfer methods. If in doubt, be sure to consult a nurse, physical therapist, or doctor.
II. Comprehensive Preparation Before Operation
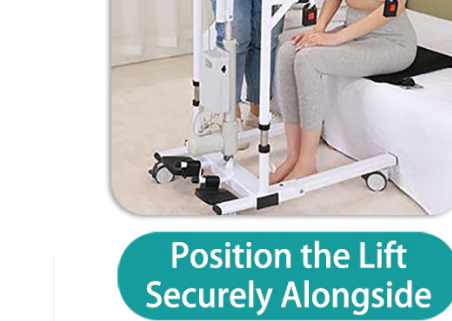
A successful transfer starts with adequate preparation. First, clear the entire path from the starting point to the destination. Remove wires, slippers, stools, or other obstacles from the floor, and ensure the passage width is at least 90 centimeters. The target location (such as a wheelchair, armchair, or toilet) should be positioned in advance—wheelchairs must have their brakes locked and footrests retracted.
Next, conduct a detailed inspection of the Hoyer Lift itself. Extend the outriggers and confirm they can fully open with a clear "click" to indicate locking; check if the wheels roll smoothly and the brakes work effectively; inspect the lift arm for signs of bending, cracking, or looseness. For electric models, confirm the battery is fully charged, the remote control responds sensitively, and the emergency stop button can reset normally. For manual models, test if the hydraulic system leaks oil and if the handle pump operates smoothly with sufficient force.
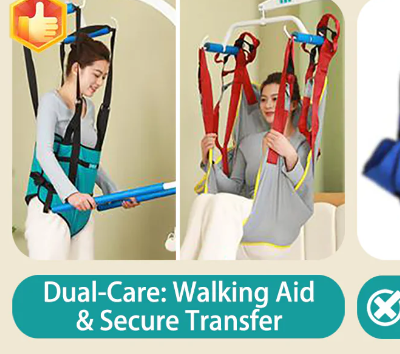
The sling is the only component that directly contacts the patient’s body, so its condition is crucial. Select a sling type suitable for the transfer purpose (e.g., standard full-body slings for bed-to-chair transfers, toileting slings for bathroom use), and carefully check for mold, odors, snags, split seams, or deformed metal buckles. Any suspected damage should result in the immediate disuse of the sling.
III. Detailed Standard Operating Procedures
Taking transfer from bed to wheelchair as an example, the operation should follow these steps:
Step 1: Proper Sling Placement
Assist the patient to lie on their side (prioritizing the stronger side), and gently slide the folded sling under their back. After helping the patient lie flat, pull the end of the sling out from under their legs. At this point, you must confirm:
The hips are fully seated in the bottom pocket of the sling (the core weight-bearing area);
The leg straps are positioned at the mid-thigh, approximately 10–15 centimeters from the knees, and never press the popliteal fossa (back of the knee) to avoid damaging the common peroneal nerve;
The fabric on the back is flat and wrinkle-free, with shoulder straps (if present) distributed symmetrically;
All lifting loops face upward and are free of twists.
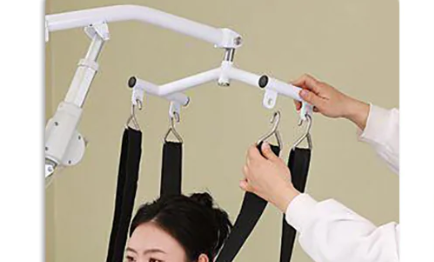
Step 2: Equipment Positioning and Connection
Push the Hoyer Lift to the bedside, ensuring the base fully enters the space under the bed. hoyer lift training manual Reconfirm that the outriggers are fully extended and securely locked. Lower the lift arm, attach the sling’s lifting loops to the hooks one by one, and check if each hook is properly closed (most designs have color indicator windows). Gently pull the sling to test the stability of the connection.
Step 3: Low-Level Test and Lifting
Slowly lift the patient 5–10 centimeters and pause for a few seconds to observe:
Is the sling slipping?
Does the patient feel pain, dizziness, or anxiety?
Is the equipment stable without tilting?
If everything is normal, continue lifting smoothly until the patient is slightly higher than the wheelchair seat.
Step 4: Movement and Precise Alignment
Release the brakes and use leg strength to push the equipment smoothly to a position directly above the wheelchair. Be careful to keep the patient’s body centered to avoid colliding with furniture. Ensure the center of the lift arm aligns with the center of the wheelchair seat to prevent tilting and potential tipping.
Step 5: Controlled Lowering and Sling Removal
Slowly lower the patient so their hips gently touch the wheelchair seat. Use short, incremental adjustments to fine-tune the height when approaching the seat to avoid impact. After confirming the patient is securely seated:
First, unfasten the leg straps;
Then, gently pull the sling out from behind the patient to avoid rubbing the skin;
Finally, straighten the patient’s clothing, adjust their sitting position for comfort, and add cushions or footrests if necessary.
Step 6: Follow-Up and Documentation
Lock the wheelchair brakes, lower the footrests, and ask about the patient’s comfort level. hoyer lift training manual Clean or replace the sling, and fold the Hoyer Lift for storage. Record the transfer time, the patient’s reaction, and any abnormal conditions in the care log.
IV. Common Mistakes and Safety Warnings
Many accidents stem from seemingly minor oversights. For example:
Unlocked or incompletely extended outriggers may cause the equipment to tip over during lifting;
Leg straps pressing the popliteal fossa may cause foot drop;
Insufficient lifting height may lead to the patient’s legs dragging on the floor, causing skin abrasions;
Excessively fast lowering may result in coccyx impact or even fractures.
In addition, never overload the equipment—even if the patient’s weight is close to the limit, extra caution is required. Do not allow the patient to hold onto the lift arm or equipment frame, as this will shift the center of gravity and increase instability. Furthermore, never use the Hoyer Lift to drag the patient or operate it on unsuitable surfaces such as slopes or loose carpets.
If abnormal noises, shaking, oil leakage, or control failure are detected during operation, stop using the equipment immediately and attach a "Faulty - Pending Repair" label.
V. Emergency Handling and Maintenance Recommendations
In case the equipment suddenly stops working:
Stay calm, reassure the patient, and try using the backup control panel (if available).
If the sling slips or the hook accidentally opens:
If at a low height, quickly support the patient;
If at a high height, do not panic—lower the patient slowly and call for assistance.
Daily maintenance is equally critical:
Clean the equipment surface after each use;
Test the emergency stop function and battery status weekly;
Lubricate the outrigger joints monthly (use silicone-based lubricant—do not use grease);
Have professional personnel conduct a comprehensive inspection every six months.
As consumables, slings are recommended to be replaced every 6–12 months even if they appear intact, as their fibers will age due to sweat, UV exposure, and repeated washing.
Conclusion: Technology as the Framework, Humanity as the Soul
The Hoyer Lift is a tool, but safe transfer is an art that combines professionalism and compassion. hoyer lift training manual Every smooth lift is a support for life; every rigorous attention to detail is a response to trust.
Please always remember: The safest Hoyer Lift is not in a warehouse, but in the hands of trained personnel who hold a sense of awe.
May you safeguard safety with professionalism and convey dignity with gentleness, moving forward steadily and warmly on the journey of caregiving.