Category: power lift chairs
Posted by 2026-01-09 14:01
hoyer lift transfer from bed to wheelchair

Step-by-Step Peace of Mind: A Complete Guide to Safe Transfers from Bed to Wheelchair Using a Hoyer Lift
For individuals with limited mobility and their caregivers, transferring from bed to wheelchair is one of the most essential yet challenging tasks in daily life. Using a Hoyer Lift to complete this process maximizes safety and comfort for both parties. However, behind a seemingly simple transfer lies a rigorous operational workflow.
This guide breaks down the full steps of transferring from bed to wheelchair using a Hoyer Lift, hoyer lift transfer from bed to wheelchair integrating key safety tips and communication techniques to ensure you can perform each transfer with confidence.
Phase 1: Meticulous Preparation – 90% of Success
1. Environmental Preparation: Create a Safe Pathway
Clear the Path: Remove wires, carpets, and any debris on the floor that could cause tripping.
Secure Equipment: Ensure the bed brakes are fully engaged. Position the wheelchair at an optimal 30–45 degree angle to the bed, lock the wheelchair brakes, and remove the armrest and footrest on the side closest to the bed.
Adjust Height: Raise the bed to a height that allows the caregiver to operate without bending (approximately waist level).
2. Equipment Inspection: Trust Stems from Rigor
Inspect the Sling: Perform a "six-point check": no wear, no tears, no loose stitching, no discoloration, intact buckles, and no cracks in lifting loops. This is a non-negotiable first step.
Inspect the Lift: Confirm the outriggers are fully extended and locked, the casters roll smoothly, and the hydraulic system (for manual models) functions properly.
3. Communication and Reassurance: Build a Trust Connection
Explain Clearly: Use a calm, reassuring tone to explain each upcoming step to the user: “We need to move you to the wheelchair now. I’ll help you with this sling, and the whole process will be safe.”
Assess Mood: Observe the user’s emotional state—are they relaxed, anxious, or confused? This determines your operating pace and communication style.
Phase 2: Core Operation – The Three-Step Smooth Transfer
Step 1: Proper Sling Placement
Assist with Side-Lying: Gently help the user roll onto their side, with their back facing you. You can use a repositioning sheet or ask another helper for assistance.
Insert the Sling: Fold the sling lengthwise, with the smooth side against the user’s back. Slide it flat under the user’s back, hips, and legs. The top edge of the sling should align roughly with the middle of their shoulder blades.
Return to Supine and Unfold: Gently roll the user back to a flat lying position, then move to the opposite side of the bed. Pull the sling out completely and unfold it, ensuring it is absolutely flat with no wrinkles.
Fasten Leg Loops (if applicable): For leg-and-back slings, guide each of the user’s legs into the leg loops and adjust to a comfortable position.
Step 2: Safe Connection and Lifting
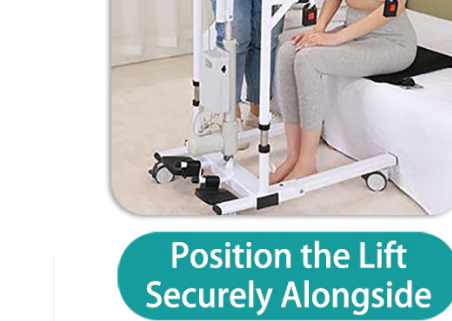
Position the Lift: Push the lift over the bed, ensuring its outriggers securely extend under the bed. The lift hooks should be roughly directly above the center of the user’s body.
Secure Connection: Firmly attach the lift’s hooks to the sling’s lifting loops. Always follow color coding or front/back markers to ensure correct orientation.
Pre-Lift and Final Check:
Operate the lift slightly to tighten the sling until the user feels securely supported but not yet lifted.
This is the final check! Quickly scan all connection points to confirm everything is secure.
Inform the user again: “We’re going to start lifting now.”
Smooth Lifting:
Operate the lift at a slow, steady speed to fully lift the user until their hips are off the bed.
Pause briefly after lifting to let the user adjust to being suspended. hoyer lift transfer from bed to wheelchair Check if their body is balanced. If tilting occurs, lower the user slowly, readjust the sling, and try again.
Step 3: Precise Transfer and Lowering
Smooth Movement:
Push or pull the lift to move it toward the wheelchair.
Best Practice: The caregiver should face the user and walk backward slowly. This allows continuous observation of the user’s condition and helps avoid obstacles behind.
Precise Alignment: Move the user smoothly to a position directly above the wheelchair. Lower slowly until the back of their calves gently touch the wheelchair seat. Ensure their body is aligned with the center of the seat.
Safe Lowering:
Continue lowering at a slow speed until the user is fully and securely seated in the wheelchair.
Ensure their back is pressed against the wheelchair backrest and their hips are seated all the way to the back of the seat.
Disconnect:
After confirming the user’s weight is fully supported by the wheelchair, disconnect all hooks one by one.
Move the lift away from the front of the user.
Phase 3: Post-Transfer Tasks – A Professional Wrap-Up
Settle the User: Fasten the wheelchair safety belt (if needed), reattach the wheelchair armrest and footrest, and adjust them to the most comfortable position for the user.
Handle the Sling: If another transfer (e.g., to the bathroom) is needed soon, hoyer lift transfer from bed to wheelchair leave the sling in place temporarily—just tuck the shoulder portion behind the user’s back. If the transfer is complete, remove the sling by helping the user roll to the side.
Document and Report: Briefly record the transfer details in the care log. Immediately report any issues encountered during the transfer (e.g., unusual equipment noises, user discomfort).
Key Safety Summary
Never Leave Unattended: Never leave a suspended user without supervision.
Two-Person Team is Best: Especially for initial transfers or with uncooperative users, a two-person team (one operating the lift, one stabilizing and reassuring the user) is optimal.
Communication is Priority: Treat the user as an active participant in the process, not a passive recipient.
Stop if in Doubt: If you feel uncertain or unsafe at any step, stop the operation and seek help.
Conclusion
A successful Hoyer Lift transfer is like a carefully choreographed “dance”—the caregiver is the guide, and the user is the core partner. hoyer lift transfer from bed to wheelchair By following this detailed guide, you can turn tension and risk into calm and confidence. Every smooth transfer is a noble tribute to the dignity of life.